
Correct lumbar support placement is one of the most underrated factors in reducing lower back pain and improving seated comfort. Many people buy ergonomic chairs yet still feel discomfort simply because they don't understand where should lumbar support be or how to align it with the spine's natural curve.
This enhanced guide explains exactly where lumbar support should be, why it matters, and how to adjust it based on scientific research, body type, and different working scenarios.
Why Lumbar Support Placement Matters (The Science Behind It)
The lumbar spine naturally curves inward (lumbar lordosis). When you sit, this curve tends to flatten, increasing disc pressure and muscular load. Studies show:
- Lumbar support reduces disc pressure by up to 40%, compared with unsupported sitting.
- Research from University of Guelph indicates that maintaining lumbar lordosis reduces fatigue in the erector spinae muscles, improving endurance during long sitting sessions.
- A classic ergonomics study (Gatty & Wild, NIH) found that the preferred lumbar support height is around the L3–L5 region, near the waistline.
Where Should Lumbar Support Be?
Optimal vertical position
Lumbar support should align with the L3–L5 vertebrae—the deepest point of your lower-back curve. This corresponds to:
- The small of your back
- At or slightly above the belt line
- Located ⅓ of the way up the backrest from the seat
Optimal depth & contact
The support should:
- Fill the natural lumbar curve
- Maintain contact even when typing
- Support the pelvis without pushing the torso forward
Too much pressure increases spine extension. Too little pressure allows slouching.
Neutral pelvic position
Your hips should sit slightly higher than your knees. This helps maintain forward pelvic tilt, which is required for lumbar lordosis.
How to Properly Adjust Lumbar Support (Step-by-Step Method)
Most people adjust their office chair with lumbar support based only on "feel," but research-based adjustment is far more accurate. Use this sequence for best results:
Step 1 — Sit fully back into the chair
Your lumbar position must be based on your seated posture, not standing posture.
Step 2 — Locate your lumbar curve
Slide a hand along your lower back to find the deepest inward curve. This is where the lumbar support should align.
Step 3 — Adjust height to the curve
Raise or lower the support until it meets the point you located.
Rule:
- If your shoulders lean forward → support is too low
- If your upper back overarches → support is too high
Step 4 — Adjust depth (firmness)
Increase depth until the support gently meets your back without pushing your pelvis excessively forward.
Step 5 — Test 3 postures
A well-adjusted lumbar support must feel natural during:
- Typing posture(slight forward lean)
- Upright posture
- Reclined posture
If comfort changes based on posture, adjust height and depth again.
Common Mistakes People Make with Lumbar Support
Placing support too low
This tilts the pelvis backward → flattens lumbar curve → increases disc pressure.
Placing support too high
Forces the thoracic spine to overextend → triggers neck and shoulder fatigue.
Sitting on the front edge of the seat
This breaks contact with the backrest, making lumbar support useless.
Using overly thick lumbar pillows
Pushes you forward, ruining neutral alignment.
Relying only on lumbar support without adjusting seat height / depth
Lumbar support is only one part of a full ergonomic system.
How Different Body Types Affect Lumbar Support Placement
Shorter users
The lumbar curve sits lower relative to the backrest.
→ Lower the support to avoid pushing the mid-back area.
Taller users
Often require lumbar support slightly higher than average to match an elongated lumbar segment.
Users with deep lumbar curves (pronounced lordosis)
Need adjustable depth to adequately fill the curve.
Users with flat backs (reduced lordosis)
Require firmer and slightly deeper support to encourage neutral alignment without forcing it.
Placement for Different Work Scenarios
For long typing sessions
Support must maintain contact even when leaning slightly forward. Choose a chair with dynamic lumbar support if possible.
For designers / coders / long-hour workers (6–10 hours)
A deeper lumbar curve is recommended to prevent fatigue.
For meeting rooms / short-term seating
Mild support is sufficient; overly aggressive lumbar support may feel unnatural.
For reclined work (phone calls, reading)
Ensure lumbar support maintains contact while reclining, preventing excessive pelvic tilt.
For home office setups
Match lumbar support with desk and monitor height.
Poor screen height often forces users to lean forward despite correct lumbar placement.
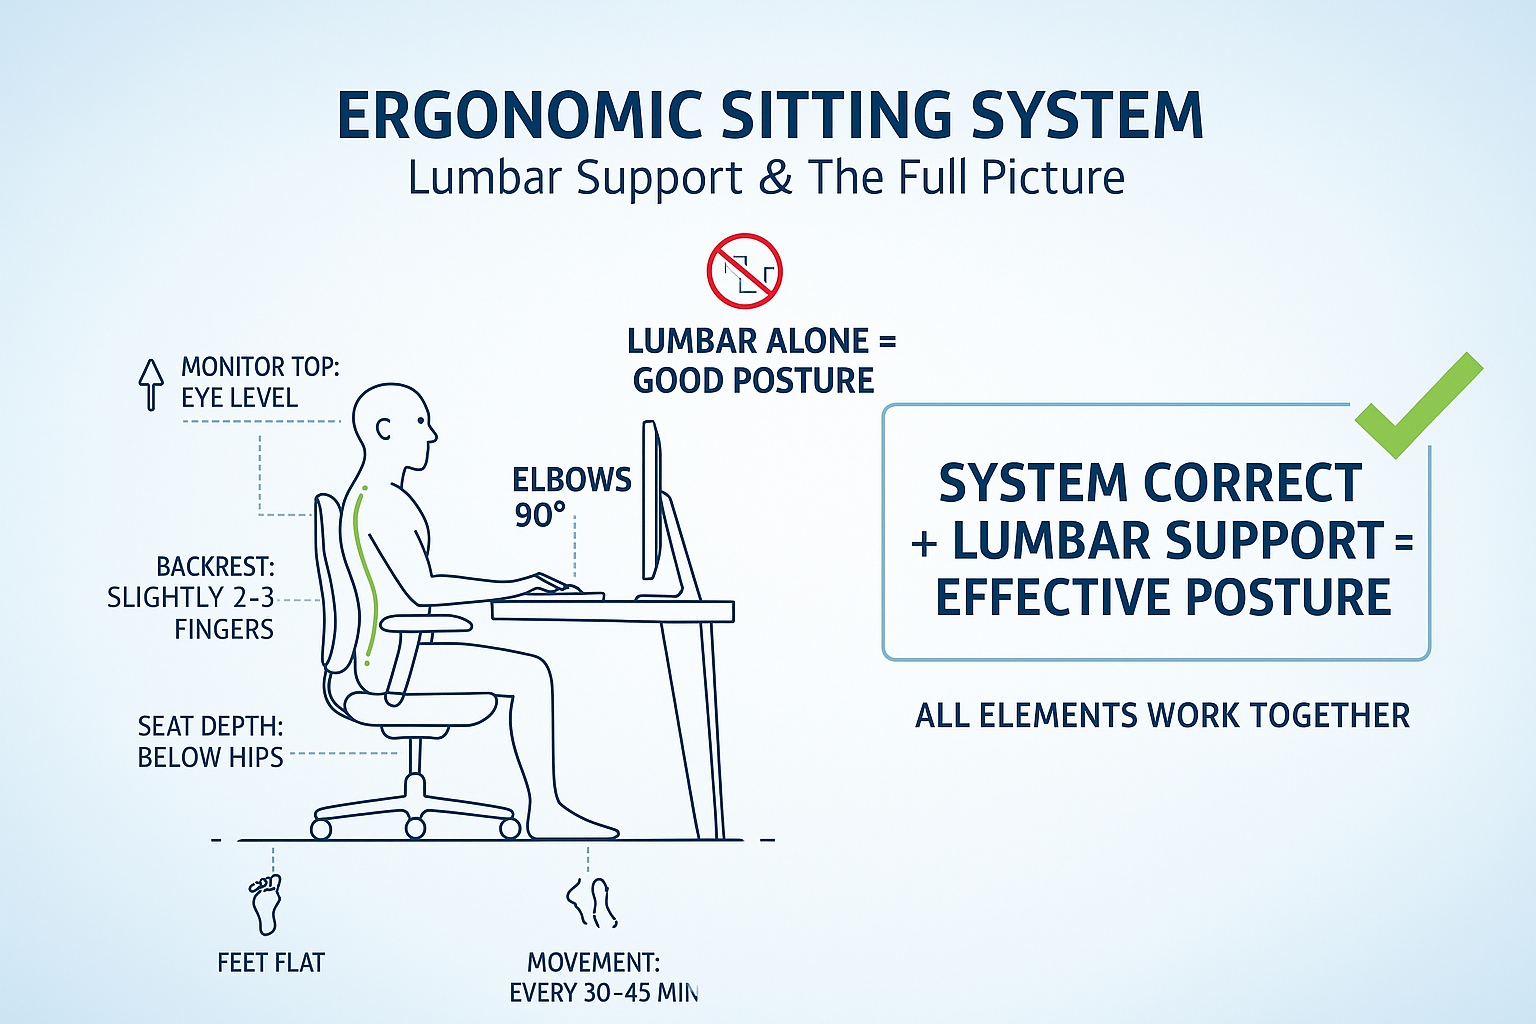
Lumbar Support Within a Full Ergonomic Sitting System
Lumbar support cannot solve posture issues alone.
Correct ergonomics require the entire workstation to work together:
- Seat height:feet flat; knees slightly below hips
- Seat depth:2–3 fingers of space behind knees
- Backrest recline:100°–110° for neutral sitting
- Monitor height:top of screen at or slightly below eye level
- Keyboard & mouse position:shoulders relaxed; elbows 90°
- Movement:change posture every 30–45 minutes
When these elements are correct, lumbar support becomes significantly more effective.
Do You Need an Additional Lumbar Support Accessory?
You may need an external pillow if:
- The chair’s built-in lumbar bar is too high / too low
- The mesh back collapses under weight
- You require deeper, firmer, or more personalized support
- You sit for more than 7–8 hours a day
Look for supports with height + depth + contour adjustability.
Research-Based Quick Positioning Checklist
| Element | Best Practice |
|---|---|
| Height | Aligned with L3–L5 (small of your back) |
| Depth | Fills curve without pushing you forward |
| Pelvis | Hips slightly higher than knees |
| Contact | Lower back stays in contact during typing |
| Posture | No slouching or excessive arching |
| Recline | Support remains effective during leaning |
FAQ: Lumbar Support Questions People Commonly Ask
Q1. Should lumbar support be on the lower or upper back?
Always the lower back (L3–L5). Upper-back support is a different ergonomic feature.
Q2. How do I know if the lumbar support is too high?
Your shoulders will pitch forward and your ribcage may feel lifted.
Q3. Should lumbar support touch my back when typing?
Yes. If it loses contact, the height or depth is not correct.
Q4. Is stronger lumbar support better?
Not necessarily. It should be supportive but not forceful.
Conclusion
The ideal lumbar support position is at the L3–L5 region, where it aligns with the natural inward curve of your lower spine. When correctly placed, it helps maintain a neutral posture, reduces slouching, and stabilizes the pelvis for healthier sitting.
With proper adjustment and a well-set workstation, lumbar support significantly reduces fatigue, improves comfort, and supports long work sessions without strain. It forms the core of an ergonomic seating setup—simple, effective, and essential for long-term spinal health.